A few weeks ago, Eli came across instructions online for making his own messenger bag out of fused plastic bags. He e-mailed it to me and asked if we could make one. In the past few days, we did.
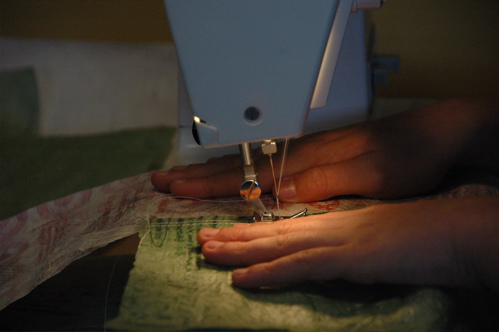
An absolute novice, he approached the sewing machine tentatively yet was open to advice and coaching. After his first few wandering seams, he got the hang of it. And eventually he got into it. From start to finish, we prepped, cut, sewed, and finished that bag together. I believe that Eli experienced the awe and sweetness of having one’s hands close to substantial mechanical power and guiding that force with purpose.
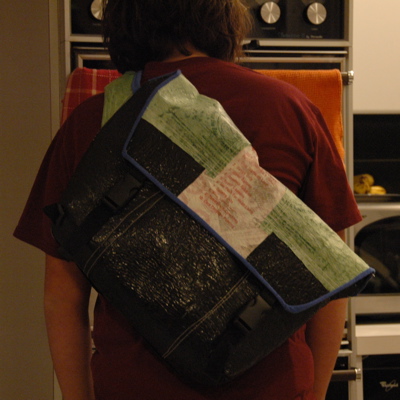
If you know Eli and me, and you’d like to see highlights from our project, then click here for a slide show (and choose “Gallery View” for most pleasing size). If you’re a sewer, or if you enjoy reading accounts of do-it-yourself projects, then read beyond this paragraph for my description of how we adapted Bre Pettis’s directions to make Eli’s bag. At the very end, you’ll find a photo of the bag we made.
Eli is 15, rides his bike to school, and wants a real messenger bag, like the kind you can find at Chrome for more than $100. But, he doesn’t have $100 to spare, having sunk all his “extra cash” recently into a Pentax SLR. He went online, looking for a cheaper version of a Chrome-like bag, and found this instead: instructions for making his own cool bag.
The link is here: Messenger Bag instructions at Craftzine. I recommend downloading the PDF, which is 17 pages long, and reading the whole thing before beginning. (It’s worth it! Not only does it instruct you, it’s charming as well. I really like how one of the designers bases his bag dimensions on Fibonacci numbers.)
Also, watch the video version of the project, featuring Bre Pettis, here: Messenger Bag by Bre Pettis on Youtube.
So, this was Eli’s idea, but he needed my help — I’m his mother — to execute it. After all, I own the sewing machine. And I know how to operate it. And I own and I can drive a car, which we drove in to get to a couple of stores to buy our supplies.
I won’t document the entire process, because, really, this is Bre Pettis’s project (see Craftzine PDF and Youtube video links above) and his design is sound. I will give you some tips for getting started, saving some money and time, and altering his instructions to make your assembly of the bag more efficient.
Supplies:
Pettis makes his bag out of a material he creates from fused plastic bags, and so did we. (If I made this again, I might try Federico’s version, which Pettis includes in the PDF, because it inspired him. Federico uses discarded vinyl signs, and these probably would be easier to cut and sew.) The plastic bags that worked for us were from Target and the supermarket (the new green “Eco-Hippo” bags); we made 16 ply fused sheets from those, according to the instructions. We didn’t have enough, so we made some more sheets from black contractor-grade garbage bags, which I had on hand; those were sufficiently thick at 8 ply. (Bags from some other stores — Wal-Mart for example — did not hold up under the iron.)
For notions, we used white upholstery thread from Gütermann and heavy duty-denim weight sewing machine needles. (About $8 total, and well spent.)
For waxed paper, we had to use a pricey soy-based version ($5), because we couldn’t find the cheap stuff in the blue box at our supermarket after we ran out of our last piece. (Note: newspaper works, but the ink adheres to the bags, so this will only work if you’re making a black bag, or don’t mind ink print on your lighter colored bags.)
For the four sets of black clips for the straps (one shoulder, one stabilizer, and two flap), we bought a couple of used satchels at Savers ($10 total) and harvested three good clips and some black strap webbing from those. We had to buy one 2-inch clip and a yard of 2-inch webbing ($7 total) at Jo-Ann. (Next time, I might go to Goodwill or a bigger thrift store, and look harder to find all the clips and webbing we needed from old satchels and luggage.)
We customized ours by lining the front flap and putting some binding around the shoulder strap edge and the front pocket edge. An old blue t-shirt worked fabulously ($0).
Working with Pettis’s diagram:
In his diagram (see PDF), Pettis recommends 10 inches as the height of the flap, back, and front. That seemed small to us, so we added an inch to the back and front, so that the bag would have a height of 11 inches. We kept the height of the front flap at 10 inches, which seems sufficient. Pettis does not indicate a width for the bag horizontals, so we chose 21 inches. Eli wears a men’s size Small, so if you are a bigger person, you might add an inch for every size up from that. (So, 22 inches wide for men’s Medium.)
We used a seam allowance of 1/2 inch all around.
A white Crayola crayon and a long yardstick were all we needed to transfer the diagram measurements onto our pieced sheet of fused plastic “fabric.”
Pettis does not give measurements or instructions for his shoulder strap. We looked at Federico’s messenger bag designs for guidance there. We made a strap about 2.5 inches wide and 14 inches long, stuffed it lightly with batting, and then stitched the 2-inch webbing strap into one end.
Revising Pettis’s instructions:
In his description, Pettis admits that, next time, he would not wait until after he had sewn up the bag to attach the straps. Here, here! I followed his instructions exactly, and regretted that I had not added the straps earlier. (As it was, I had to backtrack, rip out some seams, attach straps, and then resew some seams.)
Try this order of operations, instead, for sewing up a bag made from Pettis’s diagram:
- Fold under and sew the edges of the flap, the front, and the inside edge of the triangles.
- Make the padded shoulder strap. Baste it in place, at a 45 degree angle, in one side seam. In the other side seam, baste in place a long piece (20 inches or so) of the 2-inch webbing perpendicular to the seam.
- Sew the sides together.
- Make the male end of the stabilizer strap. (See Federico’s pictures.) Baste it in place in the bottom front of the same side to which you attached the shoulder strap.
- Sew the bottom to the bottom of the sides.
- Sew A to A and B to B. (Those indicate the edges of the triangles that secure the front to the flap.)
- Turn bag inside out.
- Sew on front flap straps by machine. Sew on the mates by hand.
- Sew on the 2-inch clip parts to the shoulder strap pieces, and adjust the length.
- On the shoulder strap, make a loop for the female end of the stabilizer clip and sew.
- Put stuff in it and go!
Tips: Sometimes it’s hard to work with the slippery material, especially when turning the bag inside out. Use kitchen rubber gloves to get some traction! Also, use your machine’s regular presser foot and zipper presser foot alternately, depending on how bunchy the seam is that you’re sewing.
Final thoughts:
Even though this bag reuses materials inventively, I don’t think it’s an environmentally-sound project overall. We had to get in a car to purchase the notions, and there were scraps left over that we either trashed or put out with the recyclables. A lot of heat from the iron went into fusing the plastic bags, and the sewing machine logged many hours. To harvest the clips from old satchels and luggage, we made an old (admittedly ugly) duffel bag unusable, and therefore trash. So… let’s not call this project recycling. I believe, however, that Federico’s version, available in the PDF and on his blog here, which calls for using discarded vinyl signs, might qualify for recycling.
The bag turned out GREAT! It took many man-hours — probably 20 altogether between Eli and me — and it looks cool and it’s really sturdy. Eli learned how to use a sewing machine, and he has the feeling of having made his own messenger bag; he even, unprompted, used the word “proud.” I had fun, too, using my sewing machine in ways it hasn’t been used before.
Should you make one? If you like to sew and want to try something totally different, and end up with something both useful and original, then, yes.
Most of the pictures in the slide show, which I put together and captioned at Slide.com, were taken by Jimmy Guterman. For a printable version of my advice on making the messenger, go to my description of it in a Google doc here.

Another great story from the house on Puddingstone. Very interactive with the entire family involved. Just think Eli leaned how to select a project, read a pattern, customize (adding blue) and learning important life skills and by using tools usually relegated to a woman.What’s the next project? A sewing room? Great job mom and dad.
This is great! I’m thinking about making one of these bags, and I have a question — was any of the material hard to sew? My Singer is fairly sturdy, but can only handle so many layers of, say, denim before needles start busting on me.
I had thought the material would be hard on the machine, too, but the fused plastic bags have some give to them. (Think how easily a thumb tack goes into cork — kind of like that effect.) The hardest stuff to sew was the heavy-duty webbing for the strap. I didn’t break any needles (I used ones meant for sewing canvas and heavy denim), but I did feel the machine chugging to get through the layers.
Feel free to check in if you hit any snags. Good luck — it’s a great summer project.